Replaced the air filter, spark plugs, and changed the oil for the 24,000 mile service. Still need to change the coolant, and brake lines, but that can wait until after pay day.
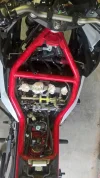
After removing the airbox I noticed dirt around the intake seals, and what looked like oil where the intake flange seats into the seal. I thought I remember reading on here that because it is a ***** to get to the screws to tighten the clamps on the seals down to leave them a little loose, and just push the airbox on. I've done this since I first changed the plugs at 8,000 miles. I figure it's also why I'm seeing dirt and oil around the seals.
So, I decided to properly tighten the clamps this time. The outer two clamps are easy enough to get to. I saw that I could get a screwdriver to the other two, but I don't have metric hex bits. I found that a T-25 Torx bit is the same size as the 4mm hex, and used that instead. The middle right one was the hardest to get to because of some bracket crap in front of it.
I also bought a set of 3" screwdriver bits from harbor freight, and a set 3/8 drive long metric hex bits. Here's a link to the screwdriver set I bought; it was $10.
36 Pc 3 In Screwdriver Bit Set with Case