
Navigation
Install the app
How to install the app on iOS
Follow along with the video below to see how to install our site as a web app on your home screen.
Note: This feature may not be available in some browsers.
More options
You are using an out of date browser. It may not display this or other websites correctly.
You should upgrade or use an alternative browser.
You should upgrade or use an alternative browser.
Sweaty Darwin. (10 character minimum so I added sweaty)Where abouts in Aus are you Rumpig?
Sent from my GT-I9505 using Tapatalk
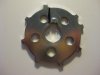
So, what needs to be cut out is my question
The rearward side of the square cut out needs to filed 0.021 inches

Sent from my GT-I9505 using Tapatalk
So, what needs to be cut out is my question
If you read the link I posted about" Final Impacts Winter mod" he explains it. Basically there is a raised section on the timing trigger wheel that locates it on the end of the crank, you file one side of the raised bit so you can rotate it to advance the timing. Final Impacts bike is an FZ6 not an FZ6R, they do have different initial timing. He said 12 degrees total was to much.
Sweaty Darwin. (10 character minimum so I added sweaty)
How is it up there, I'm from Sydney
Sent from my GT-I9505 using Tapatalk
Build up has just started so it's getting humid already. 32 every day which is normal, 36 was the top in Darwin last year but go 20 mins out of town and 42 is about normal in the wet, with 90% humidity. Gets rid of the tourists which is good. I've done couple of track days at Hidden Valley lately, good fun thrashing the arse of it.
Final Impact
Member
So your saying that if I file it down .021 in. Then rotate right, it will advance the timing 5degrees.
^^ not true...
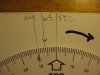
Every 0.0090" equals 1.0° Look at the post again...
Apply formula:
1.036" * 3.1415/360° = 0.0090"
4.0° * 0.0090"/deg = 0.036"
4.5° * 0.0090"/deg = 0.040"
5.0° * 0.0090"/deg = 0.045"
6.0° * 0.0090"/deg = 0.054
If you want to add 4° its 0.036"
Please read the post again as you need to verify your work by measuring it on the crank. Filing at the wrong angle can easily allow more rotation while still being the desired width. Good luck...
PS consider dropping back at least one heat range in plugs too.
The spare trigger I ordered finally turned up, 4 days - U.S to Sydney, 23 days Sydney to Darwin WTF?
Being the small amount that needs to be removed I thought i'd make a jig so I could check the measurements against reality, F.I's numbers are spot on. Ripping thru the gears there's no real noticeable difference, but where it is obvious is pulling away at lower rpm such as leaving a roundabout.
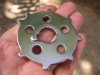
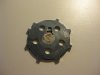
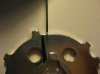
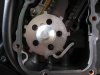
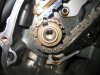
When you remove the timing chain cover there is a dowel that is part of the cover, this locates the timing chain guide which is now free to move around. Be sure to line it up before refitting the cover. To get the nut undone I jammed a screw driver between the trigger wheel and engine block, a piece of wood would be better as the screw driver left a small divot in the trigger wheel. A bit of locktite and 25lb/ft for the trigger wheel nut.
I didn't backfill the other side of the nub that was filed down but will do it when I get round to doing the cams, as it could have moved when doing the nut back up.
Being the small amount that needs to be removed I thought i'd make a jig so I could check the measurements against reality, F.I's numbers are spot on. Ripping thru the gears there's no real noticeable difference, but where it is obvious is pulling away at lower rpm such as leaving a roundabout.
When you remove the timing chain cover there is a dowel that is part of the cover, this locates the timing chain guide which is now free to move around. Be sure to line it up before refitting the cover. To get the nut undone I jammed a screw driver between the trigger wheel and engine block, a piece of wood would be better as the screw driver left a small divot in the trigger wheel. A bit of locktite and 25lb/ft for the trigger wheel nut.
I didn't backfill the other side of the nub that was filed down but will do it when I get round to doing the cams, as it could have moved when doing the nut back up.
Attachments
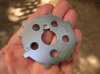
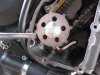
A bit of double sided tape to hold a degree wheel on the trigger and I can check progress as it's filed back. The last pic shows a set of feeler gauges to show how much has to come off.
Attachments

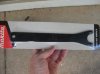
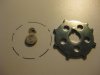
Bought a spanner for a 9" angle grinder, fits the trigger wheel and the cam gears.
Genius. Would come in handy
Sent from my GT-I9505 using Tapatalk
Final Impact
Member
Did the timing change help the driveability in any way?
It really helped the throttle response on the FZ6. Gains were throttle response, fuel economy, pickup, and aids in clutchless shifting. It was worth every file stroke!
It really helped the throttle response on the FZ6. Gains were throttle response, fuel economy, pickup, and aids in clutchless shifting. It was worth every file stroke!
Ripping thru the gears I couldn't say I could feel any difference but riding around town at lower rpm it definitely pulls a lot better from down low. Fuel economy I can't be sure because I fitted the U.S ecu and EJK chip not long after but clutchless shifts do feel smoother so , yeah worthwhile mod.
Final Impact
Member
I'm surprised it didn't wake it up more. Mods to the FZ6: air box inlet opened, S1 early style catless header, catless mid-pipe, 2bro exhaust, ignition advance, 13.0:1 AFR via Bazzaz Z-FI/ZAFM logger. 1 heat range cooler plugs CR10E also running 93 octane pump gas vs 87. Its when I started getting the AFR dialed in that it really came to life (yes, it has AIS blocked off). Also, static advance was 5.0° stock and its pretty close to 12.0° now.
The combined combination and taking the db restrictors from the 2bro and its fairly lively. It holds its own against 650hp cages so it being $3500 ride makes me grin knowing how much it cost them to do the same thing!
How much material did you actually remove from the triggers locator tab?
The combined combination and taking the db restrictors from the 2bro and its fairly lively. It holds its own against 650hp cages so it being $3500 ride makes me grin knowing how much it cost them to do the same thing!
How much material did you actually remove from the triggers locator tab?
Similar threads
- Replies
- 4
- Views
- 2K