Yah F'ing China. I think it is going to look nice when its done.That blows and I cant wait to see the final product

2009 FZ6R Salvage Project
- Thread starter pjmac5
- Start date
Pics of exhaust are in the second post.:needpics:
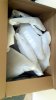
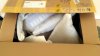
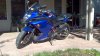
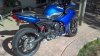
Fairings From China
So I finally received my Fairings from China. I ordered these on DHgate from Motostar LTD. I will add additional pictures of the Fairing installed. As of right now, I am about half way finished and so I have a very good feel for the quality of these Fairings.
These kits are complete kits, I think I received 23 pieces in all. I paid $523 total.
Compared to OEM:
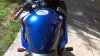
Paint Job (A) - It is a beautiful Blue, almost spot on YAMAHA Blue.
Plastic Quality (B) - On average the plastic is thinner then the OEM. The main Fairings are just about the same thickness but the black pieces are thinner.
Overall Fit (B-) - Some of the holes as well as the location of the locking pieces on the Fairing are off.
I am by no means a professional mechanic. However, I am quite competent with tools and repairing most things mechanical and I have found the installation of these Fairings to be a significant challenge.
Would I buy from China again? Maybe. If I needed a complete Fairing kit and my OEM Fairing could not be repaired, I would do it. However, if I had some cracks, etc. I would break out the fiberglass and repair the OEM Fairings.
Knowing what I know now, I would repair my OEM Fairings and bring them to a body shop to get them painted. I will get some pictures up as soon as I can.
So I finally received my Fairings from China. I ordered these on DHgate from Motostar LTD. I will add additional pictures of the Fairing installed. As of right now, I am about half way finished and so I have a very good feel for the quality of these Fairings.
These kits are complete kits, I think I received 23 pieces in all. I paid $523 total.
Compared to OEM:
Paint Job (A) - It is a beautiful Blue, almost spot on YAMAHA Blue.
Plastic Quality (B) - On average the plastic is thinner then the OEM. The main Fairings are just about the same thickness but the black pieces are thinner.
Overall Fit (B-) - Some of the holes as well as the location of the locking pieces on the Fairing are off.
I am by no means a professional mechanic. However, I am quite competent with tools and repairing most things mechanical and I have found the installation of these Fairings to be a significant challenge.
Would I buy from China again? Maybe. If I needed a complete Fairing kit and my OEM Fairing could not be repaired, I would do it. However, if I had some cracks, etc. I would break out the fiberglass and repair the OEM Fairings.
Knowing what I know now, I would repair my OEM Fairings and bring them to a body shop to get them painted. I will get some pictures up as soon as I can.
Attachments
-
 94 KB Views: 31
 -
 92.3 KB Views: 30
So I finally received my Fairings from China. I ordered these on DHgate from Motostar LTD. I will add additional pictures of the Fairing installed. As of right now, I am about half way finished and so I have a very good feel for the quality of these Fairings.
These kits are complete kits, I think I received 23 pieces in all. I paid $523 total.
Compared to OEM:
Paint Job (A) - It is a beautiful Blue, almost spot on YAMAHA Blue.
Plastic Quality (B) - On average the plastic is thinner then the OEM. The main Fairings are just about the same thickness but the black pieces are thinner.
Overall Fit (B-) - Some of the holes as well as the location of the locking pieces on the Fairing are off.
I am by no means a professional mechanic. However, I am quite competent with tools and repairing most things mechanical and I have found the installation of these Fairings to be a significant challenge.
Would I buy from China again? Maybe. If I needed a complete Fairing kit and my OEM Fairing could not be repaired, I would do it. However, if I had some cracks, etc. I would break out the fiberglass and repair the OEM Fairings.
Knowing what I know now, I would repair my OEM Fairings and bring them to a body shop to get them painted. I will get some pictures up as soon as I can.
yes please do share some installed pics
tr1umph4nt
New Member
berry nice man!
The blue looks nice. Did you ever post a write up on how you did the paint? Im interested on doing this too.")
The blue looks nice. Did you ever post a write up on how you did the paint? Im interested on doing this too.
The blue looks nice. Did you ever post a write up on how you did the paint? Im interested on doing this too.
I never really went into detail, but here is a little:
I have a couple of pictures at the beginning of the thread but really not much compared to the process
My tank required some dents to be filled. For large dents, I used Bondo Hair Reinforced Fiberglass Filler. The dents need to be stripped to metal. Do not put Bondo over old paint. I use a belt sander to knock down the Fiberglass. Sanding the fiberglass by hand will take forever. You are mainly looking to duplicate the curves of the original tank.
Then I used Bondo Body filler to fill smaller dents and detail the area filled with fiberglass. You will probably fill and sand 3 or more times. First time with a coarse paper, then a 600 grit an finally a 1000 grit. After all of this work, you will think it is perfect only to realize that you were wrong after you paint it.
After the body work was done, I sanded the entire tank. 250 grit, 600 grit wet, 1000 grit wet. I didn't get all the old paint off, but that is not entirely important. You need to get all the old Clear off and make sure it is smooth. Even scrapes from sandpaper will show-up in the new paint. Make sure it is smooth.
I ordered paint from ColorRite. I actually used 2 Aerosol cans, but 3 is probably better. For clear I used SprayMax 2K Clear and primer. If you are going to use Aerosol cans, this is the only Clear that will come close to using a Urethane Clear sprayed from a gun. DO NOT use Aerosol Clear from ColorRite or the store. This will come off the first time you get gas on it.
Painting has to all be done in one sitting. Do not paint, then Clear days later. Also DO NOT wet sand the paint before Clearing. You want to Clear as soon as the paint sets.
I painted outside which makes it difficult. If you can find a dust free location, you are in better shape. So you will hang the tank and apply the primer first. Let it dry for 30-60 minutes. You can wet sand the primer with a 2000 grit. Then you can apply the paint. Probably 3 coats. Let the paint Flash between coats to avoid runs. Let the paint dry 30-60 minutes. It will actually feel dry to the touch but it is not cured by no means so be careful. At this point you can apply a decal if you wish, Yamaha or whatever. Now Clear the entire tank. Probably 2-3 coats. Also let the Clear flash between coats. Do not mess with the paint before you clear. You might notice a run in the Clear, do not mess with it. Just keep Clearing.
Now you have a beautiful looking tank that is wet. You might see dust, hair or a bug land on the tank, do not touch it. Let it dry. The Clear will be dry to the touch in 3 hours but Clear will stay soft for a good week and takes 3 weeks to cure so leave the tank hanging for a couple of days.
Now 2 days later the Clear will be dry enough to wet sand. You can go over the tank and wet sand out any runs or any dust or hair that might of landed on the tank while drying. Us a 2500 grit wet. Then buff with a light compound using a buffer. The paint and Clear cure over the next month and as that happens all of the imperfections from body work and sanding will appear so do a good job with this in the beginning or you will regret it.
nice write up...I never really went into detail, but here is a little:
I have a couple of pictures at the beginning of the thread but really not much compared to the process
My tank required some dents to be filled. For large dents, I used Bondo Hair Reinforced Fiberglass Filler. The dents need to be stripped to metal. Do not put Bondo over old paint. I use a belt sander to knock down the Fiberglass. Sanding the fiberglass by hand will take forever. You are mainly looking to duplicate the curves of the original tank.
Then I used Bondo Body filler to fill smaller dents and detail the area filled with fiberglass. You will probably fill and sand 3 or more times. First time with a coarse paper, then a 600 grit an finally a 1000 grit. After all of this work, you will think it is perfect only to realize that you were wrong after you paint it.
After the body work was done, I sanded the entire tank. 250 grit, 600 grit wet, 1000 grit wet. I didn't get all the old paint off, but that is not entirely important. You need to get all the old Clear off and make sure it is smooth. Even scrapes from sandpaper will show-up in the new paint. Make sure it is smooth.
I ordered paint from ColorRite. I actually used 2 Aerosol cans, but 3 is probably better. For clear I used SprayMax 2K Clear and primer. If you are going to use Aerosol cans, this is the only Clear that will come close to using a Urethane Clear sprayed from a gun. DO NOT use Aerosol Clear from ColorRite or the store. This will come off the first time you get gas on it.
Painting has to all be done in one sitting. Do not paint, then Clear days later. Also DO NOT wet sand the paint before Clearing. You want to Clear as soon as the paint sets.
I painted outside which makes it difficult. If you can find a dust free location, you are in better shape. So you will hang the tank and apply the primer first. Let it dry for 30-60 minutes. You can wet sand the primer with a 2000 grit. Then you can apply the paint. Probably 3 coats. Let the paint Flash between coats to avoid runs. Let the paint dry 30-60 minutes. It will actually feel dry to the touch but it is not cured by no means so be careful. At this point you can apply a decal if you wish, Yamaha or whatever. Now Clear the entire tank. Probably 2-3 coats. Also let the Clear flash between coats. Do not mess with the paint before you clear. You might notice a run in the Clear, do not mess with it. Just keep Clearing.
Now you have a beautiful looking tank that is wet. You might see dust, hair or a bug land on the tank, do not touch it. Let it dry. The Clear will be dry to the touch in 3 hours but Clear will stay soft for a good week and takes 3 weeks to cure so leave the tank hanging for a couple of days.
Now 2 days later the Clear will be dry enough to wet sand. You can go over the tank and wet sand out any runs or any dust or hair that might of landed on the tank while drying. Us a 2500 grit wet. Then buff with a light compound using a buffer. The paint and Clear cure over the next month and as that happens all of the imperfections from body work and sanding will appear so do a good job with this in the beginning or you will regret it.
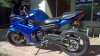
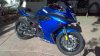
Some Pics
After what turned into an exhausting Fairing project, I think I will spend a little time actually riding this bike.yes please do share some installed pics
Attachments
-
 100.8 KB Views: 21
 -
 99.2 KB Views: 18
 -
 99.4 KB Views: 18
 -
 102.4 KB Views: 15
 -
 101.8 KB Views: 15
 -
 98.8 KB Views: 18