sti491
Member
Many thanks to Martin for helping me with great tips how to best fabricate my exhaust system, and for providing Power Commander maps. As Martin would say, “Thanks Mate”!
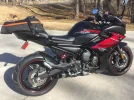
I have a 2012 FZ6R I bought a few months ago with only 2,200 miles on it. Always garaged. It even smelled new. Now it has 3,400 miles on it.
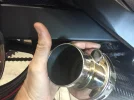
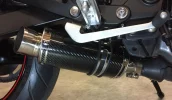
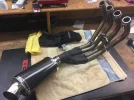
Paying $500-1,000 for a full exhaust plus $300 for fuel management just seemed crazy. So I did it the Marthy way! Total cost: Delkevic DS70 CF, two small pieces of 304 stainless tubing, header gaskets, block off plates, Power Commander… $507. I got sort of lucky on the Delkevic can…. They sent me the wrong one. Then the replacement was missing the clamp, so it was a bit of a cluster. But Janeille, the Branch Manager was sympathetic and gave me a very nice “customer accommodation” discount refund for my troubles… Yay! Despite their order pickers being stoned, the can appears to be very high quality.
Yes, I felt a little trepidation hacking a perfectly good “Like New” exhaust to do this. However, I hated that turd of a cat. It’s the only thing about the bike I didn’t like. Maybe that's not true. I already changed the rear fender and turn signals!
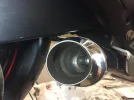
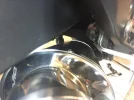
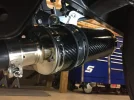
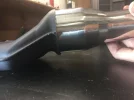
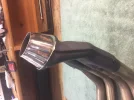
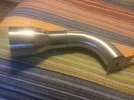
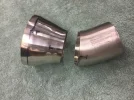
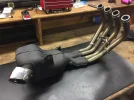
I had to make 4 cuts: to separate the cat, for length and diameter on the 3” to 2” reducer on both ends, and to cut the angle on one end of the 90 degree 2” tube I bought. They say measure twice & cut once… which you can do with the reducer. The small angled piece though, is impossible to measure under the bike. So I eyeballed everything the best I could under the bike, hand drew a cut line with a Sharpie marker and cut it. All I have to say is I need to go buy a lottery ticket… each cut was perfect the first time. Seemed miraculous to me given the circumstances. I got even luckier finding a local welder that did ‘er up for me for $20. Tig. Not exactly “row-of-dimes” welding (he was recently certified), but definitely $20 worth. It's strong and air tight.
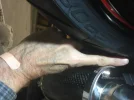
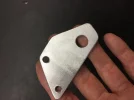
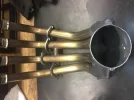
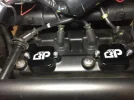
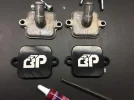
I couldn’t be happier. I doubt a more expensive full system would breath all that much better. Plus I have the satisfaction of doing it myself. The Delkevic DS70 CF can weighs 2.7 lbs, Call it 3lbs with the two very short 304 SS welded connectors. Compared to the OEM cat turd and air injection system I removed substituting Black Path block off plates, this is good for a 9lbs weight reduction per my scale… now, if I could just stick with my healthy diet this thing would fly! That stock cat is a boat anchor.
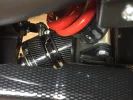
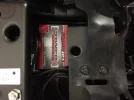
Pretty happy with my map switch and volt meter install too. I recently took a risk and spent big $ on a Lithium Phosphate battery. I’m still not sure that was a wise thing to do(?). They have mixed cool weather reviews so I thought an $8 volt meter was a good investment. It looks pretty cool there to me, where I can take a quick peak mashing the starter button. It balances out where I put my Power Commander map switching button on the other side. It does not take a picture very well, but it is a water proof digital red LED and matched the rest of the bike, and my gear indicator nicely.
So if you are not afraid of cutting things up on your bike, I recommend this approach. Price is reasonable all considering. Big weight reduction. It is loud! I’m leaving the DBK in for sure. Very deep throaty sound at idle, barks like a guard dog when you blip it.
Riding it is nothing short of transformational. Here are the highlights:
1. Noise: It’s most definitely loud! I left the DBK in, and after riding still have no plan to remove it. Went on a 2 hour country road shake down ride yesterday and nobody tailgated me! Around 4 pm when the sun was low I was just about to make a left 90 degree turn where a car was stopped. She looked right at me (she had a stop sign, I didn’t), she put her hand up to shade her eyes as she was rolling into my path. She could not see me in the glare (at least I knew it and was prepared to let her go). I blipped a downshift harder than I needed to. She jammed the brakes as she heard me. That would not have happened before! AT 60 mph it does not drone, and it seems to queit down as the the wind noise sort of cancels it out inside my helmet. At full song it is a beast. F1 fighter sounds. The deceleration and downshifting noises are joyful!
2. Performance: I had not ridden in several weeks and there was still some water patches from a recent snow melt, so the first hour of my ride I took it easy. The first thing that was very noitacable was the smooth throttle response and “ridabilty” improvement. Not that it was bad stock, but it’s better now. Secondly, instead of a nearly linear stock power curve, now there is a distinct surge of power maybe half to 2/3rds in the revs… I’m not sure I don’t watch the tach much. Maybe around 7,000 rpm? And I’m not talking when you hammer it either, just smooth cruising, rolling on the throttle. It is somewhat subtle. It’s not like you are going to do burnouts cracking the throttle, but there is a definitely a smooth, increased torque just cruising around. When you hammer it, well, sit forward… the front end gets light through 3rd! Full throttle midrange and top end is WAY stronger than stock. Not sure how much is the accel pump. I have it set at 75% throttle/for 25 revs/at 10% fuel add. I am thinking about changing it today to 70/30/15. If anyone with a similar set up has a recommendation on the best Accel Pump setting, please advise.
3. Maps: I have 2 maps loaded: Martin’s AdvGear RevB, and the Dynojet stock FZ6R map, which they say was done on a Dyno and Delkevic says the bike with only the exhaust should perform fine & safely without fuel management. That map rides great. Martin’s map rides better! At first Martin’s map seems subtly better. But when your country road carving you realize it’s a lot better! It barks back deccelerating a bit more, an indication to me it’s definitely richer, as the feul tables show.
4. Mileage: I have never checked the mileage on my bike before. I set the odometer when I got gas yesterday, so we’ll see.
Once again, thank you Martin for all your advice and also the maps. I have to go ride now… ☺
I have a 2012 FZ6R I bought a few months ago with only 2,200 miles on it. Always garaged. It even smelled new. Now it has 3,400 miles on it.
Paying $500-1,000 for a full exhaust plus $300 for fuel management just seemed crazy. So I did it the Marthy way! Total cost: Delkevic DS70 CF, two small pieces of 304 stainless tubing, header gaskets, block off plates, Power Commander… $507. I got sort of lucky on the Delkevic can…. They sent me the wrong one. Then the replacement was missing the clamp, so it was a bit of a cluster. But Janeille, the Branch Manager was sympathetic and gave me a very nice “customer accommodation” discount refund for my troubles… Yay! Despite their order pickers being stoned, the can appears to be very high quality.
Yes, I felt a little trepidation hacking a perfectly good “Like New” exhaust to do this. However, I hated that turd of a cat. It’s the only thing about the bike I didn’t like. Maybe that's not true. I already changed the rear fender and turn signals!
I had to make 4 cuts: to separate the cat, for length and diameter on the 3” to 2” reducer on both ends, and to cut the angle on one end of the 90 degree 2” tube I bought. They say measure twice & cut once… which you can do with the reducer. The small angled piece though, is impossible to measure under the bike. So I eyeballed everything the best I could under the bike, hand drew a cut line with a Sharpie marker and cut it. All I have to say is I need to go buy a lottery ticket… each cut was perfect the first time. Seemed miraculous to me given the circumstances. I got even luckier finding a local welder that did ‘er up for me for $20. Tig. Not exactly “row-of-dimes” welding (he was recently certified), but definitely $20 worth. It's strong and air tight.
I couldn’t be happier. I doubt a more expensive full system would breath all that much better. Plus I have the satisfaction of doing it myself. The Delkevic DS70 CF can weighs 2.7 lbs, Call it 3lbs with the two very short 304 SS welded connectors. Compared to the OEM cat turd and air injection system I removed substituting Black Path block off plates, this is good for a 9lbs weight reduction per my scale… now, if I could just stick with my healthy diet this thing would fly! That stock cat is a boat anchor.
Pretty happy with my map switch and volt meter install too. I recently took a risk and spent big $ on a Lithium Phosphate battery. I’m still not sure that was a wise thing to do(?). They have mixed cool weather reviews so I thought an $8 volt meter was a good investment. It looks pretty cool there to me, where I can take a quick peak mashing the starter button. It balances out where I put my Power Commander map switching button on the other side. It does not take a picture very well, but it is a water proof digital red LED and matched the rest of the bike, and my gear indicator nicely.
So if you are not afraid of cutting things up on your bike, I recommend this approach. Price is reasonable all considering. Big weight reduction. It is loud! I’m leaving the DBK in for sure. Very deep throaty sound at idle, barks like a guard dog when you blip it.
Riding it is nothing short of transformational. Here are the highlights:
1. Noise: It’s most definitely loud! I left the DBK in, and after riding still have no plan to remove it. Went on a 2 hour country road shake down ride yesterday and nobody tailgated me! Around 4 pm when the sun was low I was just about to make a left 90 degree turn where a car was stopped. She looked right at me (she had a stop sign, I didn’t), she put her hand up to shade her eyes as she was rolling into my path. She could not see me in the glare (at least I knew it and was prepared to let her go). I blipped a downshift harder than I needed to. She jammed the brakes as she heard me. That would not have happened before! AT 60 mph it does not drone, and it seems to queit down as the the wind noise sort of cancels it out inside my helmet. At full song it is a beast. F1 fighter sounds. The deceleration and downshifting noises are joyful!
2. Performance: I had not ridden in several weeks and there was still some water patches from a recent snow melt, so the first hour of my ride I took it easy. The first thing that was very noitacable was the smooth throttle response and “ridabilty” improvement. Not that it was bad stock, but it’s better now. Secondly, instead of a nearly linear stock power curve, now there is a distinct surge of power maybe half to 2/3rds in the revs… I’m not sure I don’t watch the tach much. Maybe around 7,000 rpm? And I’m not talking when you hammer it either, just smooth cruising, rolling on the throttle. It is somewhat subtle. It’s not like you are going to do burnouts cracking the throttle, but there is a definitely a smooth, increased torque just cruising around. When you hammer it, well, sit forward… the front end gets light through 3rd! Full throttle midrange and top end is WAY stronger than stock. Not sure how much is the accel pump. I have it set at 75% throttle/for 25 revs/at 10% fuel add. I am thinking about changing it today to 70/30/15. If anyone with a similar set up has a recommendation on the best Accel Pump setting, please advise.
3. Maps: I have 2 maps loaded: Martin’s AdvGear RevB, and the Dynojet stock FZ6R map, which they say was done on a Dyno and Delkevic says the bike with only the exhaust should perform fine & safely without fuel management. That map rides great. Martin’s map rides better! At first Martin’s map seems subtly better. But when your country road carving you realize it’s a lot better! It barks back deccelerating a bit more, an indication to me it’s definitely richer, as the feul tables show.
4. Mileage: I have never checked the mileage on my bike before. I set the odometer when I got gas yesterday, so we’ll see.
Once again, thank you Martin for all your advice and also the maps. I have to go ride now… ☺
Attachments
-
 IMG_7404.webp69.5 KB · Views: 111
 -
 IMG_7405.webp92.2 KB · Views: 129
 -
 IMG_7396.webp118.7 KB · Views: 121
 -
 IMG_7388.webp67.1 KB · Views: 115
 -
 IMG_7384.webp72.8 KB · Views: 121
 -
 IMG_7386.webp72.2 KB · Views: 102
 -
 fullsizeoutput_17ab.webp16.7 KB · Views: 112
 -
 IMG_7354.webp69 KB · Views: 113
 -
 IMG_7389.webp57.7 KB · Views: 121
 -
 IMG_7432.webp104.2 KB · Views: 146