
uscgduncan
New Member
Fender Eliminator Installation Guide
This is specific to the “USCGDuncan” fender eliminator. However, the basics are the same for any fender eliminator bracket. :thumbup:Thanks 99vengeur for the installation feedback/write-up.:thumbup:
You can pre-tape or heat shrink your wiring prior to installation to provide a cleaner and more professional installation if desired.
First, you need to remove the passenger seat and then the small panel covering the wiring. Follow the wires from the "trunk” down into the right side of the tail sub-frame. You may need to remove the right rear cowling for easier access. Locate the wire loom and the connectors for the turn signals and tag light. They will be wrapped in a little bit of insulation, but it can be pulled back out of the way.
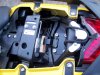 Here you can see the 4 mounting bolts as well.
View attachment 17496
Disconnect the two plugs, gray and black, and the two bullet style connectors for the tag light with clear pieces of plastic tubing over them. Unplug these and replace the tubing over the bare connectors to prevent any possible contact between the two leads. Then, once everything is loose and disconnected, the fender can be pulled off by removing the four bolts from the trunk tail section. See photo above.
Once you get the fender pulled off, you need to free the stock lights from it if you are going to use them on the new one. This is a little tricky, but isn't too bad. There is a screw in the housing for the signal that needs to be removed in order to take off the rubber boot, but keep track of the screw; you are going to re-use it.
Once the signals are free from the fender, you need to cut the little metal "thingy" :thumbup:that is around the wires. Use a pair of wire snips and cut two little sections to release the wires. Be careful not to cut the insulation.
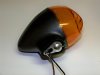
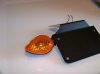
The rubber boot is removed and ready to be attached to the new FE.
So, now you should have the stock signals completely free from the old fender. Now it's just a matter of putting it all back together. Remember, you will not use the rubber portion of the signal posts.
I provided holes on the tabs to:
1. Drill to the size needed for aftermarket signals.
2. Leave as is to mount the stock signals.
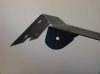
Disclaimer: The FE was not designed for use with the stock lights, but they will mount up securely and look great installed.
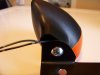
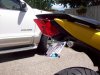
For option 1, put masking tape on both sides of the hole and drill it to fit your signal application. Now, you can mount up your signals to the new fender eliminator bracket as seen above
Once that is done, feed the wires for each signal back up into the "trunk" and attach the fender eliminator bracket to the underside of the tail using the stock bolts and new hardware provided.
Once mounted and your hands are free, you can re-connect the wires.
For stock signals, just plug in the connectors, gray to gray and black to black.
For aftermarket signals, you will need to splice in the turn signals wires. You may choose to use butt connectors, blade type crimp connectors, crimp caps, or even solder them. Do not use the "twist and tape it" method. You need to have some sort of mechanical means of securing your connections. You don’t need to worry too much about polarity as long as the signals use an incandescent type bulb. However, for LED’s, polarity must be observed or the lights will not work. Temporarily connect the wires and turn the key to "ON" and verify that when the left signal is on, that the left one actually blinks, same for the right. After you have ops checked the lights and know that the polarity and positions are correct, you can then make the final connections and clean up the wiring with zip ties. It doesn't hurt to be too cautious; we don't want to signal one way and turn another, giving cagers another reason to hate bikers.
For tag lighting, I used the LED tag light bolts. For these, I just connected the + wires from the lights together (same for the -), and connected to the stock tag light wires making sure polarity +/- was correct.
Note: You have to mount the tag prior to making any connections on the tag lights as the wiring runs through the tag-FE-attachment nut and then to the connectors.
View attachment 17498
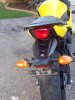
That should be it. Your application may vary slightly. Clean up your wiring with zip ties and black tape if needed. Check all of the hardware for security and install any panels removed from the bike.The bike looks better and is about 7 pounds lighter as well.
Attachments
-
 95.4 KB Views: 660
