OEM upper fairing small top pieces poor fitment?


sti491

Member
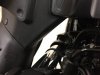
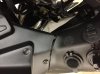
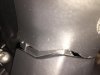
I'm wondering if this is common, or something is wrong how my faring top pieces around the handlebars fit together. Please take a look at the pics. I bought this 2012, 2,200 mile Raven recently. It was never dropped (I know the prior owner). The part I took the pics of I have had off the bike adding the accessory plugs, but it was like this before then. The other side is the same way. A big ugly gap. Hard to believe Yamaha engineered it that way.

I've played with both sides and can't seem to get it to fit flush. Any thoughts are appreciated.
 

Attachments

It’s not just you, those stupid little things are brutal to reinstall! I’ve had mine off and on many times and as simple as it should be, it’s always my least favorite part of putting my bike back together. Sometimes I can get one or both on okay, other times not so I give up and leave it half-assed installed the way yours are. Mine weren’t this way from the factory, they looked fine with no gap. So no, Yamaha didin’t engineer them this way. Even just getting that one bolt started is a royal P.I.T.A!

I don’t have any actual advice for you, just commiseration. I have seen others comment on here about having difficulty with those as well. All I can offer is to either be super patient and keep fighting until you get it, or just leave the ugly gap as is. You’ll stop noticing it quickly.

Also, nice choice to add the accessory plugs. I put one on mine too and it’s great to have navigation all day long with no concerns about battery life.
 

sti491

Member
Thanks for the commiseration. It would be great if anyone knows how to do it. Being a 2012 mine must have been off before I bought it for something. I''m usually pretty good at figuring out stuff, but these pieces have me stumped! The accessory plugs turned out pretty good. Measure twice cut-once....! Thanks.
 

TexanFZ6R

Senior Member
Every time I take mine off (which I hate doing because they are a huge PITA to get back on), I have to wiggle the two pieces and eventually they will pop into place. The way they have all of those little tabs intertwined on those two pieces is confusing, and a little unnecessary.

What plugs did you use? I really want to add a 12v usb plug to charge my phone.
 

sti491

Member
Texan, if you can elaborate any more I sure would appreciate it. Are you putting that one piece on with all the others around it already in place? Not being able to get it is bugging me. I swear it seems like it can't be done... I take the rear, hold it high, insert the front, particularly the longest tab with the hole in it for the plastic rivet, and lower it and slide forward. It snaps in place everywhere except for the lower part on the inside????

This is the part I got from Amazon for the plugs.

https://www.amazon.com/gp/product/B075H9WZ88/ref=oh_aui_detailpage_o06_s00?ie=UTF8&psc=1

I did not use the square frame thing, and used velcro so the cover would not flap in the wind when open. I took an old USB and cut the plug off to use as a plug in the second USB to keep rain out of it when only using one USB plug, which is what I do all the time riding with my phone in it's bar mount. I attached the power wire to my front switched running light wire in the turn signal, so it goes off when the ignition is off.

Any more description on to get those fairing pieces on all the way would be great!
 

sti491

Member
Well, I go it! What a cluster f*#k! For me to do it I needed to reverse engineer it. I took the entire front dash part off and clipped all three top pieces together off the bike.

The side-bottom inside clip is the tough one. The ONLY way I could get it was to slide it under the middle piece clip part (on the large the plastic trim around the gauge cluster) . There was no way it would snap in, like it appears it should do. It has to slide up from underneath into place on my bike.

The catch 22 is, to insert the large tab on top, the entire piece has to be slid in with the back raised up.... exactly the opposite of what it takes to get the bottom part in.

Here is the only way I could do it:
1. Put the main tab in as before, starting with the back way up in the air and sliding the big tab loosely in. Then DO NOT slide it forward to clip the two side fairing clips in, as it seems intuitive to do.

2. Most importantly, now is the time to fight with the bottom inside clip. The piece just loosely installed HAS to slide up under the front part at that inside bottom clip, while not jamming the very small plastic tab that's just left of center... and keeping the main clip where the rivet goes more or less in place. This is not easy. You have to get both hands down there with little room and leverage. With patience and perseverance it will slide up and behind the the front part clip holder.

3. Before you are awestruck with the revelation it actually can be done, put the rivet back in. Now it is all connected correctly, but the entire piece is not slid into the top of the side fairing clips. Obviously these are designed to have been slid into from the back earlier in the process, but every time I did that it was IMPOSSIBLE to get the inside lower clip done. And now with everything else done you can not slide it forward from the back.

4. Carefully pull/bend the side fairing away from the part you just installed, and you can pop it together, just barely.

This may not be the OEM procedure. But, it was the ONLY way I could do it.

It looks way better:
 

Attachments

Last edited:
That’s some pretty serious determination! Thanks for posting how you were able to pull this off. I have been able to get them on properly some of the time, but not usually. As my bike sits, stored for winter, only one side is on properly. I think later I’ll go tinker for a bit with following your method and see if it works for me. Thanks again.
 

TexanFZ6R

Senior Member
Sorry I didn't get back to you quicker. My bike has been at my parent's for 2 weeks so I haven't even seen it lol. I've always gotten them back together. It takes a little while, but they've always gone back together right for me
 

sti491

Member
Those that can do this easily have pure talent, that's all I have to say!
 

TexanFZ6R

Senior Member
I ended up ordering one of those USB outlets. Did you run an inline fuse with it? If so, 10 amp seems to be enough. What did you run?
 

sti491

Member
From what I read, it does not need a separate fuse. I tapped into the front left signal running light, so it goes off with the ignition. It was an easy, close, already fused, switched place to connect it.
 

TexanFZ6R

Senior Member
From what I read, it does not need a separate fuse. I tapped into the front left signal running light, so it goes off with the ignition. It was an easy, close, already fused, switched place to connect it.
That's a good idea, thanks!
 

sti491

Member
Wow... this addendum to my original post just goes to show, "You don't know what you don't know, until you know".

So I had my bike apart doing block off plates, Power Commander and exhaust. I was dreading putting these pieces back on, even though I felt confident I'd get it. I knew the technique I originally documented worked, but it was obvious that it wasn't the way it was designed to be done.

So I tried it the way it's supposed to be done again, lifting the back and sliding the front and side tabs together first.... which leaves the offending lower inside gap and that inside front one clip miserably un-done.

That's when I stumbled on "the key" to the puzzle. All you have to do is push fairly hard with one hand on the outside rear part of the fairing pushing it toward the tank. With the other hand reach down to that last clip and assist it to fasten, while still holding the fairing toward the tank with the other hand. It is too easy this way!

I had to remove and replace these several times installing my Power Commander map switch and volt meter. I can do it fast and with ease now FTW!
 

Thanks for following up on this. I probably won’t be tinkering with my bike any time soon but I’ve copied this to my FZ6R notes file so I can refer to it the next time I have to do this. Thanks!:rockon:


Top