
adazine
Premium Member
Looking at side view pictures of my bike, I noticed that the exhaust was hanging lower than other ones I've seen on the internet, so I did some research and sure enough it was not installed properly. I've now taken off the exhaust and looked into the ports and saw rust in port 1 and oil in port 4. I don't know anything about the engine other than to feed it gas, so I'm hoping our engine guru's could tell me why they all don't look the same inside. Thanks in advance for any information. Attached pictures aren't the best, but you can see what I am seeing.
When re-installing where is the high heat silicone applied? I bought anti seize for the threads too !
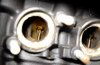
Ports 1 & 2
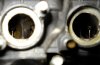
Ports 3 & 4
When re-installing where is the high heat silicone applied? I bought anti seize for the threads too !
Ports 1 & 2
Ports 3 & 4

